How to finish this little embroidered round pincushion designed by me.
Materials required:
Linen - I used 25 count dublin lugana
DMC thread
Fabric
Lightweight interfacing
Fabric glue
Cord trim
Tiny swarovski crystal or button for the centre
Sewing thread
Finishing tutorial for a small round pincushion
You may use this design for your own personal use, please do not make up for resale on Etsy or any other sales website - please respect my copyright.
Cut around any round object that is the size of pillow that you require
Fold pillow in half and tack stitch lines,
fold in half again stitching tacking lines until it looks like this
You are now ready to make the spider web roses
Thread the needle using one strand of DMC thread folded in half
and thread through the needle
This gives you a loop to thread through on the back of the pillow and holds the stitches in place
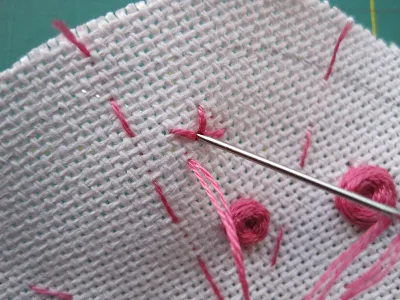
Stitch one stitch like this....
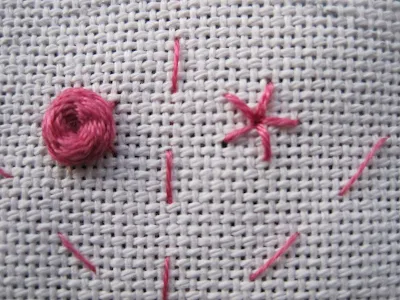
stitching into the centre make a five star stitch......
like this.
bring your needle up between two of the stitches and weave under
and over each of the stitches, going around in a circle
continue going under and over until the flower is formed
the spider web roses should now be positioned like this.....
stitch some little green vines and leaves using an outline stitch
and small chain stitches for the leaves
cut a circle of fabric the same size
iron light weight interfacing to the back of each piece
place the circular object on the interfaced side of the stitched
piece and draw around it - this will be your stitching guideline
Place the stitched piece and the fabric piece right sides together and stitch by hand or machine along the pencil marks, leaving an
opening to fill with stuffing.
Trim within about 4 millimetres of the pencil line.
Turn right side out and press with an iron
your opening should now look like this
stuff the pillow with a filling of your choice - I use polyester filling
slip stitch the opening closed - the glue is for attaching the cording later
Thread your needle using the loop method above - you should have two strands of thread, stitch from the centre, taking the thread to the back and come up through the centre point, space the stitches as shown in the photo.
You will need plenty of thread on your needle for this step.
( sorry I forgot to photograph this step - if anyone has a problem please let me know)
you will need fabric glue and cord trim for the edge
If you click on the photo below you can see I have overstitched on the cording at the edge to give it more definition.
Glue a small swarovski crystal to the centre on both sides
You should now have a lovely little tuffet pillow that would make a lovely gift, I designed and stitched this set for a friends birthday.
Copyright - Lynn B
So there you have it, one finishing tutorial for a round embroidered pincushion.


.JPG)


7 comments
Oh! It's a beautiful little pillow! I like it very much. Thank you for the tutorial, I will make it, and will photograph. If you are interested in, you can see it on my blog in few days.
Aniko (from Hungary)
I finished the first one. Not prefect, but it's mine. Thank you again. Have a nice day!
Aniko (www.szegedilany.blogspot.com)
GRAZIE!!!!!!!!!!!!è chiarissimo!!!!!!!anche le roselline sembrano semplici credevo fossero + difficili!!!grazie mille proverò a farne uno il prima possibile e ti farò sapere!!!!
So exquisite! You have the most amazing little tips, and I need to get my cross-stitching stuff back out of the drawer I put it in when I started knitting!
I am from Russia. Here is my pillow http://shei-ka.blogspot.com/2010/07/blog-post_22.html
Thank you for the tutorial!
C теплом из России:)
WOW!!!... me encnataron esas rosas tan sencillas de realizar!!!!
Very nice tute... and easy to follow
http://craftaworld.blogspot.com/
Love
Farah
Post a Comment