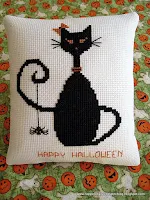
The cross stitch cat is one of my latest designs and can be purchased using the buy now button below. The PDF pattern is sent via email and includes:
Cross stitch chart
DMC and Anchor thread listing
Beginner cross stitch instructions.
Skill level - beginner or advanced
Materials required to make the pillow - finished pillow size measuring 5.5" x 6"
Finished cross stitched design
Fabric for back of pillow about 6" x 7"
Fusible fleece
Polyester fibre fill
Needle and thread for stitching
Cut around the cross stitch design leaving about 1" around the border
Cut the fleece and the fabric to the size of the finished cross stitched piece
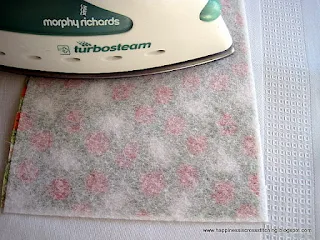
Place the fleece 'iron on' side down to the wrong side of the fabric
Press down with hot iron following manufacturers instructions
With wrong sides together pin the cross stitch design to the fabric
Stitch around the edge using a sewing machine or by hand, leaving a narrow seam allowance
and leaving an opening at the bottom to allow for stuffing with fibrefill.
Turn right side out and press, but ensure you place the cross stitch side down onto a thick towel
to prevent your cross stitches from being flattened.
Turn under the same size seam allowance on the opening as you used for the sides.
Fill with fibrefill, starting at the top left, right and then the middle, ensuring you fill
right into the corners.
The opening should now look like this.
Tie a small knot into the stitching thread and slip stitch the opening closed, ensuring you stitch
along the folded line as this gives a neat finish.
Your pillow should now look like this.
The second tutorial will show the finished cord trim around the edge, I will be posting that
tutorial within the next week in time for stitching this for halloween.

The fleece supports the fabric and gives a much neater finish.
The reverse side and side view.
I used 14 count aida, it is very easy to use and ideal for stitching as a pillow
because you can follow the line of the fabric when stitching, this helps you achieve a neat finish.
If you prefer you can frame the design in a hoop.
You can use any design to make this pillow but if you like this halloween cat design you can
purchase it below for $5
I am currently away on holiday, patterns will only be sent on my return on Sunday 13th September 2015.


8 comments
Thanks, Lynn, for the tip about the fleece, very helpful!
Thank you for these instructions I've been thinking of making a pillow for a while but not been quite sure how to!
Thank you for the tutorial ;)
Thanks for sharing! :)
verry nics, i love it
Beautiful site, I'll go visit you.
Ivana
Magnificos trabajos...Mis felicitaciones. Saludos.
This is just what I've been looking for! A great tutorial for a very beginner sewer like me! Thank you!
Post a Comment